4 Unix and the Command Line

4.1 What is Unix?
Unix is a family of operating systems that originated at Bell Labs in 1969 and was released publicly in 1973. Its design philosophy emphasizes modularity—small programs that do one thing well and can be combined to accomplish complex tasks. This approach has proven remarkably durable, and Unix-based systems remain dominant in scientific computing, web servers, and high-performance computing environments.
Linux is an open-source implementation of Unix that runs on everything from embedded devices to the world’s fastest supercomputers. MacOS is built on a Unix foundation, which means Mac users have native access to Unix commands. Windows historically used a different approach, but recent versions include the Windows Subsystem for Linux (WSL), allowing Windows users to run Linux environments alongside their Windows applications.
Understanding Unix is essential for modern data science. You will need it to access remote computing resources like supercomputer clusters, to run bioinformatics software that is only available through the command line, and to automate repetitive tasks. The skills you develop here will transfer across platforms and remain relevant throughout your career.
4.2 The Shell and Terminal
The shell is a program that interprets your commands and communicates with the operating system. When you type a command, the shell parses it, figures out what you want to do, and tells the operating system to do it. The results are then displayed back to you.
Bash (Bourne Again SHell) is the most common shell on Linux systems and was the default on MacOS until recently (MacOS now defaults to zsh, which is very similar). The shell runs inside a terminal application, which provides the window where you type commands and see output.

On Mac, you can access the terminal by opening the Terminal app or a third-party alternative like iTerm2. On Linux, look for a Terminal application in your system menus. Windows users should install the Windows Subsystem for Linux following Microsoft’s documentation, then access it through the Ubuntu app or similar.
RStudio also includes a terminal pane, which can be convenient when you want shell access without leaving your R development environment.
4.3 Anatomy of a Shell Command
Shell commands follow a consistent structure. You type a command name, possibly followed by options that modify its behavior, and arguments that specify what the command should operate on. The shell waits at a prompt—typically $ for regular users or # for administrators—indicating it is ready to accept input.
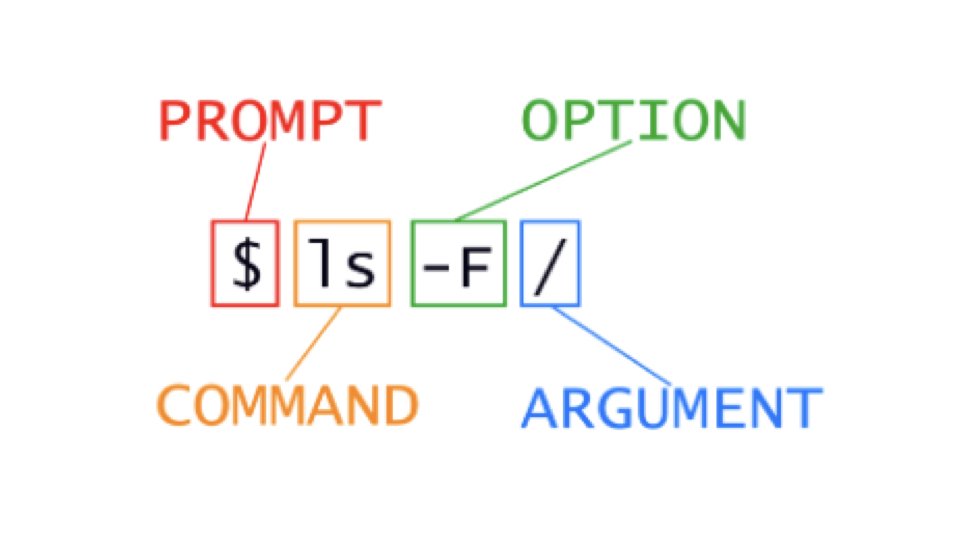
Consider the command ls -l Documents. Here, ls is the command (list directory contents), -l is an option (use long format), and Documents is the argument (the directory to list). Options usually begin with a dash and can often be combined: ls -la combines the -l (long format) and -a (show hidden files) options.
4.4 File System Organization
Unix organizes files in a hierarchical structure of directories (folders) and files. The root directory, represented by a single forward slash /, sits at the top of this hierarchy and contains all other directories.
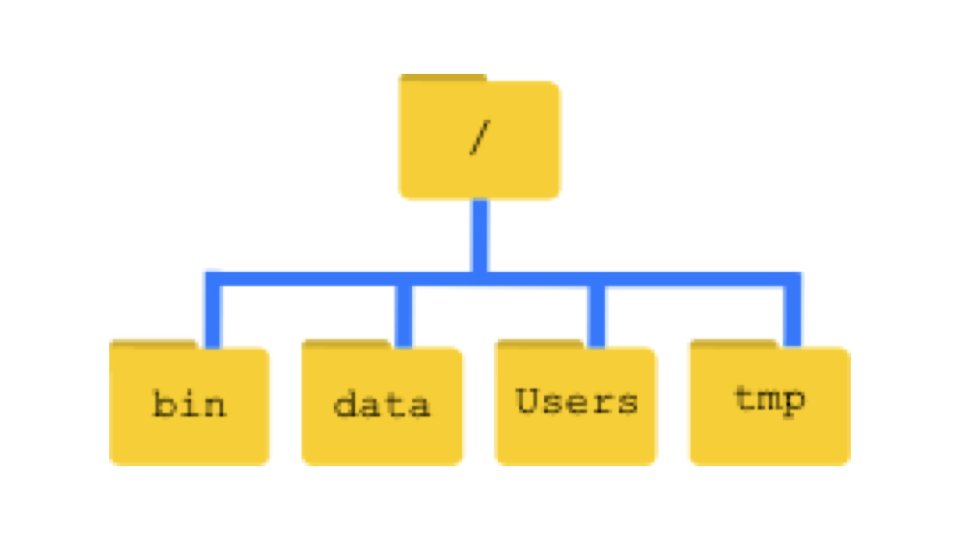
Your home directory is your personal workspace, typically located at /Users/yourusername on Mac or /home/yourusername on Linux. The tilde character ~ serves as a shorthand for your home directory, so ~/Documents refers to the Documents folder in your home directory.
Every file and directory has a path—a specification of its location in the file system. Absolute paths start from the root directory and give the complete location, like /Users/wcresko/Documents/data.csv. Relative paths specify location relative to your current directory, so if you are in your home directory, Documents/data.csv refers to the same file.
4.5 Navigation Commands
The most fundamental navigation command is pwd (print working directory), which tells you where you currently are in the file system. This is often the first thing you type when opening a terminal to orient yourself.

pwdThe ls command lists the contents of a directory. Without arguments, it lists the current directory. With a path argument, it lists that location.
ls                  # list current directory
ls Documents        # list the Documents folder
ls -l               # long format with details
ls -a               # include hidden files (starting with .)
ls -la              # combine long format and hidden files
ls -lS              # long format, sorted by size
The cd command (change directory) moves you to a different location.
cd Documents        # move into Documents
cd ..               # move up one level (parent directory)
cd ~                # move to home directory
cd /                # move to root directory
cd -                # move to previous location
4.6 Working with Files and Directories
Creating new directories uses the mkdir command.
mkdir project_data
mkdir -p analysis/results/figures  # create nested directories
The -p flag tells mkdir to create parent directories as needed, which is useful for creating nested folder structures in one command.
To remove an empty directory, use rmdir.
rmdir empty_folder # remove an empty directoryNote that rmdir only works on empty directories. For directories with contents, you need rm -r (discussed below).
Creating a new, empty file uses the touch command.
touch newfile.txt                  # create an empty file
touch notes.md data.csv            # create multiple files
The touch command is also useful for updating the modification timestamp of existing files without changing their contents.
Moving and renaming files uses the mv command.
mv old_name.txt new_name.txt       # rename a file
mv file.txt Documents/             # move file to Documents
mv file.txt Documents/newname.txt  # move and rename
Copying files uses cp.
cp original.txt copy.txt           # copy a file
cp -r folder/ backup/              # copy a directory recursively
Removing files uses rm. Be careful with this command—there is no trash can or undo in the shell.
rm unwanted_file.txt               # remove a file
rm -r unwanted_folder/             # remove a directory and contents
rm -i file.txt # ask for confirmation before removingIf you need to stop a running command—perhaps you started a process that is taking too long or realize you made a mistake—press Ctrl-C. This sends an interrupt signal that terminates most running processes and returns you to the command prompt.
4.7 Viewing File Contents
Several commands let you examine file contents without opening them in an editor.
The cat command displays the entire contents of a file.
cat data.txtFor longer files, head and tail show the beginning and end.
head data.csv          # first 10 lines
head -n 20 data.csv    # first 20 lines
tail data.csv          # last 10 lines
tail -f logfile.txt    # follow a file as it grows
The less command opens an interactive viewer that lets you scroll through large files.
less large_data.txtInside less, use arrow keys to scroll, / to search, and q to quit.
The wc command counts lines, words, and characters.
wc data.txt            # lines, words, characters
wc -l data.txt         # just lines
4.8 Getting Help
Unix provides documentation through manual pages, accessible with the man command.
man ls # manual page for ls commandManual pages can be dense, but they are comprehensive. Use the spacebar to page through, / to search, and q to exit. Many commands also accept a --help flag that provides a shorter summary.
ls --helpOf course, the internet provides extensive resources. When you encounter an unfamiliar command or error message, searching online often leads to helpful explanations and examples.
4.9 Pipes and Redirection
One of Unix’s most powerful features is the ability to combine simple commands into complex pipelines. The pipe operator | sends the output of one command to another command as input.
ls -l | head -n 5           # list files, show only first 5
cat data.txt | wc -l        # count lines in file
Redirection operators send output to files instead of the screen.
ls -l > file_list.txt       # write output to file (overwrite)
ls -l >> file_list.txt      # append output to file
These features enable powerful text processing. Combined with tools like grep (search for patterns), sort, and cut (extract columns), you can accomplish sophisticated data manipulation with compact commands.
grep "gene" data.txt                    # find lines containing "gene"
grep -c "gene" data.txt                 # count matching lines
sort data.txt                           # sort lines alphabetically
sort -n numbers.txt                     # sort numerically
cut -f1,3 data.tsv                      # extract columns 1 and 3 from tab-separated file
4.10 Advanced Text Processing
The basic commands above are just the beginning. Unix provides powerful tools for searching, manipulating, and transforming text files—skills that are invaluable when working with biological data.
Pattern Matching with grep
The grep command becomes even more powerful when you use special characters to define patterns. These patterns, called regular expressions, allow you to search for complex text structures.
Common special characters in grep patterns:
^matches the beginning of a line$matches the end of a line.matches any single character (except newline)*matches zero or more of the preceding character\smatches any whitespace character
grep "^embryo" data.tsv          # lines starting with "embryo"
grep "gene$" data.tsv            # lines ending with "gene"
grep "sample.*control" data.tsv  # lines with "sample" followed by anything then "control"
grep "^embryo_10\s" data.tsv     # lines starting with "embryo_10" followed by whitespace
Useful grep flags include:
-ccounts matching lines instead of displaying them-vreturns lines that do NOT match the pattern (inverse match)-nincludes line numbers in the output-iperforms case-insensitive matching
grep -v "^#" data.tsv            # exclude comment lines starting with #
grep -n "error" logfile.txt      # show line numbers for matches
grep -c "ATCG" sequences.fasta   # count lines containing this sequence
Search and Replace with sed
The sed (stream editor) command is commonly used for search-and-replace operations. The basic syntax uses slashes to separate the pattern, replacement, and flags:
sed 's/old/new/' file.txt        # replace first occurrence on each line
sed 's/old/new/g' file.txt       # replace all occurrences (global)
sed 's/\t/,/g' file.tsv          # convert tabs to commas
sed 's/^/prefix_/' file.txt      # add prefix to beginning of each line
By default, sed prints the modified text to the terminal. To modify a file in place, use the -i flag (use with caution):
sed -i 's/old/new/g' file.txt # modify file in placeA safer approach is to redirect output to a new file:
sed 's/old/new/g' input.txt > output.txtColumn Operations with cut and join
The cut command extracts specific columns from delimited files. By default, it assumes tab-delimited data.
cut -f1,2 data.tsv               # extract columns 1 and 2 (tab-delimited)
cut -f1,3 -d"," data.csv         # extract columns 1 and 3 (comma-delimited)
cut -f2-5 data.tsv               # extract columns 2 through 5
The join command combines two files based on a common field, similar to a database join. Both files should be sorted on the join field.
join file1.txt file2.txt         # join on first field
join -1 2 -2 1 file1.txt file2.txt  # join file1's column 2 with file2's column 1
Sorting with Advanced Options
The sort command has many options for controlling how data is sorted.
sort -n data.txt                 # sort numerically
sort -r data.txt                 # sort in reverse order
sort -k2,2 data.tsv              # sort by second column
sort -k2,2 -n data.tsv           # sort by second column numerically
sort -k2,2 -nr data.tsv          # sort by second column, numerically, in reverse
sort -u data.txt                 # sort and remove duplicate lines
sort -t"," -k3,3 data.csv        # sort comma-separated file by third column
Flexible Text Processing with awk
The awk command is an extremely powerful tool for processing structured text. It treats each line as a record and each column as a field, making it ideal for tabular data. Fields are referenced using $1, $2, etc., where $0 represents the entire line.
awk '{print $1}' data.tsv                    # print first column
awk '{print $1, $3}' data.tsv                # print columns 1 and 3
awk -F"," '{print $1, $2}' data.csv          # specify comma as delimiter
awk '{print NR, $0}' data.txt                # print line numbers with each line
One of awk’s strengths is its ability to filter rows based on conditions:
awk '$3 > 100 {print $1, $3}' data.tsv       # print columns 1 and 3 where column 3 > 100
awk '$2 == "control" {print $0}' data.tsv    # print lines where column 2 is "control"
awk 'NR > 1 {print $0}' data.tsv             # skip header (print from line 2 onward)
awk '$4 >= 0.05 {print $1}' results.tsv      # extract IDs where p-value >= 0.05
You can also perform calculations:
awk '{sum += $2} END {print sum}' data.tsv           # sum of column 2
awk '{sum += $2} END {print sum/NR}' data.tsv        # average of column 2
awk '{print $1, $2 * 1000}' data.tsv                 # multiply column 2 by 1000
Combining Commands in Pipelines
The real power of Unix text processing comes from combining these tools. Here are some examples relevant to biological data analysis:
# Count unique gene names in column 1 (skipping header)
tail -n +2 data.tsv | cut -f1 | sort | uniq | wc -l

# Extract rows with significant p-values and sort by effect size
awk '$5 < 0.05' results.tsv | sort -k3,3 -nr | head -20

# Convert a file from comma to tab-delimited and extract specific columns
sed 's/,/\t/g' data.csv | cut -f1,3,5 > subset.tsv

# Find all unique values in column 2 and count occurrences
cut -f2 data.tsv | sort | uniq -c | sort -nr

# Process a FASTA file to count sequences per chromosome
grep "^>" sequences.fasta | cut -d":" -f1 | sort | uniq -cThese tools have many more capabilities than we can cover here. The man pages provide comprehensive documentation, and online resources like the GNU Awk User’s Guide offer in-depth tutorials. With practice, you will develop intuition for which tool to use for different tasks.
4.11 Wildcards and Pattern Matching
One of Unix’s most powerful features is wildcards—special characters that match multiple files at once. Instead of typing each filename individually, you can specify patterns that match many files simultaneously.
The asterisk * matches any number of any characters (including zero characters):
ls *.csv              # all CSV files
ls data*              # all files starting with "data"
ls *.txt *.md         # all text and markdown files
rm temp*              # remove all files starting with "temp"
The question mark ? matches exactly one character:
ls sample?.txt        # sample1.txt, sample2.txt, etc. (but not sample10.txt)
ls data_??.csv        # data_01.csv, data_AB.csv, etc.
Square brackets [] match any single character from a set:
ls sample[123].txt    # sample1.txt, sample2.txt, or sample3.txt
ls data_[0-9].csv     # data_0.csv through data_9.csv
ls file[A-Z].txt # fileA.txt through fileZ.txtCombining rm with wildcards can be dangerous. The command rm * deletes everything in the current directory without confirmation. Always use ls first to see what a wildcard pattern matches before using it with rm. Consider using rm -i for interactive confirmation when removing files with wildcards.
Wildcards are expanded by the shell before the command runs, so they work with any command:
# Count lines in all CSV files
wc -l *.csv

# Copy all R scripts to a backup folder
cp *.R backup/

# Search for "gene" in all text files
grep "gene" *.txt
4.12 Environment Variables
Unix maintains settings called environment variables that affect how the shell and programs behave. These variables store information about your user session, system configuration, and program preferences. Environment variables are distinguished by a $ prefix when you reference them.
Several important environment variables are set automatically:
# Your home directory
echo $HOME
/home/wcresko

# Your username
echo $USER
wcresko

# Your current shell program
echo $SHELL
/bin/bash

# Where Unix looks for executable programs
echo $PATH
/usr/local/bin:/usr/bin:/bin:/home/wcresko/bin

# Your current working directory
echo $PWD
/home/wcresko/projects
The PATH variable is particularly important—it contains a colon-separated list of directories where Unix searches for programs. When you type a command like ls or python, Unix looks through each directory in your PATH until it finds a matching executable. You can find where a program is located using which:
which python
/usr/bin/python

which R
/usr/local/bin/R
You can set your own environment variables and use them in commands:
# Set a variable
PROJECT_DIR=~/projects/analysis

# Use it (note the $)
cd $PROJECT_DIR
ls $PROJECT_DIR/data
To make environment variables available to subprocesses (programs you launch), use export:
export PROJECT_DIR=~/projects/analysisTo see all environment variables currently set, use env or printenv:
env | head -20 # Show first 20 environment variablesShell Configuration Files
Your shell can be customized through configuration files that run when you open a terminal. For Bash, the main configuration files are ~/.bashrc (for interactive shells) and ~/.bash_profile (for login shells). For zsh (the default on modern macOS), use ~/.zshrc.
Common customizations include:
# Add a directory to your PATH
export PATH="$HOME/bin:$PATH"

# Create an alias (shortcut) for a common command
alias ll='ls -la'
alias rm='rm -i'    # Always ask before deleting

# Set default options for programs
export R_LIBS_USER="$HOME/R/library"
After editing configuration files, apply the changes by either starting a new terminal or running:
source ~/.bashrc4.13 File Permissions
Unix is a multi-user system, and every file has permissions controlling who can read, write, or execute it. Understanding permissions is essential for security and for running scripts on shared computing clusters.
When you run ls -l, you see permission strings at the beginning of each line:
ls -l
-rwxr-xr-x 1 wcresko staff 2048 Jan 15 10:30 analysis.sh
drwxr-xr-x 3 wcresko staff   96 Jan 15 09:00 data
The permission string -rwxr-xr-x encodes three sets of permissions:
| Position | Meaning |
|---|---|
| 1st character | Type: - (file), d (directory), l (link) |
| Characters 2-4 | Owner permissions |
| Characters 5-7 | Group permissions |
| Characters 8-10 | Others (everyone else) permissions |
Within each set, the three characters represent:
r(read): View file contents or list directory contentsw(write): Modify file or add/remove files in directoryx(execute): Run file as program or enter directory-(dash): Permission denied for that operation
So -rwxr-xr-x means: this is a regular file; the owner can read, write, and execute; the group can read and execute; others can read and execute.
Changing Permissions with chmod
The chmod command changes file permissions. You can use symbolic notation or numeric (octal) notation.
Symbolic notation uses letters and operators:
# Add execute permission for the owner
chmod u+x script.sh

# Remove write permission for group and others
chmod go-w data.csv

# Set exact permissions
chmod u=rwx,g=rx,o=rx script.sh
The letters are: u (user/owner), g (group), o (others), a (all). The operators are: + (add), - (remove), = (set exactly).
Octal notation uses numbers where each permission has a value:
| Permission | Value |
|---|---|
| read (r) | 4 |
| write (w) | 2 |
| execute (x) | 1 |
Add the values for each set. For example, rwx = 4+2+1 = 7, and r-x = 4+0+1 = 5.
chmod 755 script.sh    # rwxr-xr-x (executable script)
chmod 644 data.csv     # rw-r--r-- (readable data file)
chmod 700 private/     # rwx------ (private directory)
Common permission patterns:
755: Executable scripts (owner can modify, everyone can run)644: Data files (owner can modify, everyone can read)700: Private directories (only owner has access)600: Private files (only owner can read/write)
Making Scripts Executable
When you write a shell script, you need to make it executable before you can run it directly:
# Create a simple script
echo '#!/bin/bash' > myscript.sh
echo 'echo "Hello, World!"' >> myscript.sh

# Try to run it (will fail)
./myscript.sh
# bash: ./myscript.sh: Permission denied

# Make it executable
chmod +x myscript.sh

# Now it works
./myscript.sh
# Hello, World!
The #!/bin/bash line at the top of the script (called a “shebang”) tells Unix which program should interpret the script.
4.14 Bioinformatics File Formats
Biological data comes in many specialized file formats. Understanding these formats is essential for working with genomic, transcriptomic, and other biological data. Most of these formats are plain text (or compressed plain text), making them amenable to Unix command-line processing.
Tabular Data Formats
CSV (Comma-Separated Values) and TSV (Tab-Separated Values) are general-purpose formats for tabular data. CSV files use commas as delimiters, while TSV files use tabs. TSV is often preferred in bioinformatics because biological data may contain commas (e.g., in gene descriptions).
# View a CSV file
head data.csv

# Count rows in a TSV file (excluding header)
tail -n +2 data.tsv | wc -l

# Extract specific columns from TSV
cut -f1,3,5 data.tsv
FASTA Format
FASTA is the most common format for storing nucleotide or protein sequences. Each sequence has a header line starting with > followed by the sequence identifier and optional description, then the sequence itself on subsequent lines.
>sequence_1 Human beta-globin
MVHLTPEEKSAVTALWGKVNVDEVGGEALGRLLVVYPWTQRFFESFGDLSTPDAVMGNPK
VKAHGKKVLGAFSDGLAHLDNLKGTFATLSELHCDKLHVDPENFRLLGNVLVCVLAHHFG
>sequence_2 Mouse beta-globin
MVHLTDAEKAAVSCLWGKVNSDEVGGEALGRLLVVYPWTQRYFDSFGDLSSASAIMGNPK
# Count sequences in a FASTA file
grep -c "^>" sequences.fasta
# Extract sequence headers
grep "^>" sequences.fasta
# Get sequence IDs only (first word after >)
grep "^>" sequences.fasta | cut -d" " -f1 | sed 's/>//'
# Find sequences containing a specific pattern
grep -B1 "ATCGATCG" sequences.fastaFASTQ Format
FASTQ extends FASTA by including quality scores for each base, essential for next-generation sequencing data. Each record has four lines:
- Header line starting with
@ - Sequence
- Separator line starting with
+ - Quality scores (ASCII-encoded)
@SEQ_ID_001
GATTTGGGGTTCAAAGCAGTATCGATCAAATAGTAAATCCATTTGTTCAACTCACAGTTT
+
!''*((((***+))%%%++)(%%%%).1***-+*''))**55CCF>>>>>>CCCCCCC65
Quality scores are encoded as ASCII characters, where each character represents a quality value. Higher ASCII values indicate higher confidence in the base call.
# Count reads in a FASTQ file (4 lines per read)
echo $(( $(wc -l < reads.fastq) / 4 ))

# Extract just the sequences (every 2nd line of each 4-line record)
awk 'NR % 4 == 2' reads.fastq

# View quality scores only
awk 'NR % 4 == 0' reads.fastq | headFASTQ files are often compressed with gzip (.fastq.gz or .fq.gz). Use zcat or gunzip -c to read them without decompressing:
zcat reads.fastq.gz | head -8 # View first two readsSAM/BAM Format
SAM (Sequence Alignment/Map) stores sequence alignments—how sequencing reads map to a reference genome. BAM is the compressed binary version of SAM.
SAM files have a header section (lines starting with @) followed by alignment records. Each alignment record is tab-separated with fields including read name, flags, reference name, position, mapping quality, CIGAR string (alignment description), and the sequence.
# View SAM header
samtools view -H alignment.bam

# Count aligned reads
samtools view -c alignment.bam

# View first few alignments
samtools view alignment.bam | head

# Extract reads aligning to a specific chromosome
samtools view alignment.bam chr1 | head

# Convert BAM to SAM
samtools view -h alignment.bam > alignment.samThe samtools program is essential for working with SAM/BAM files. It provides functions for viewing, filtering, sorting, and indexing alignment data. Install it through conda or your system package manager.
BED Format
BED (Browser Extensible Data) describes genomic intervals—regions on chromosomes. The first three columns are required: chromosome, start position (0-based), and end position. Additional columns can include name, score, strand, and visualization parameters.
chr1    1000    5000    gene_A    100    +
chr1    7000    9000    gene_B    200    -
chr2    3000    4000    gene_C    150    +
# Count features
wc -l features.bed
# Extract features on chromosome 1
awk '$1 == "chr1"' features.bed
# Find features longer than 1000 bp
awk '($3 - $2) > 1000' features.bed
# Sort by chromosome and start position
sort -k1,1 -k2,2n features.bedVCF Format
VCF (Variant Call Format) stores genetic variants—SNPs, insertions, deletions, and structural variants. It has a header section (lines starting with ## for metadata and #CHROM for column names) followed by variant records.
Each variant record includes chromosome, position, ID, reference allele, alternate allele(s), quality score, filter status, and additional information. Sample genotypes appear in subsequent columns.
##fileformat=VCFv4.2
##INFO=<ID=DP,Number=1,Type=Integer,Description="Total Depth">
#CHROM  POS     ID      REF     ALT     QUAL    FILTER  INFO    FORMAT  SAMPLE1
chr1    10177   rs367896724     A       AC      100     PASS    DP=30   GT:DP   0/1:15
chr1    10352   rs555500075     T       TA      100     PASS    DP=25   GT:DP   0/0:20
# Count variants (excluding header)
grep -v "^#" variants.vcf | wc -l
# Extract SNPs only (single-character REF and ALT)
awk '!/^#/ && length($4)==1 && length($5)==1' variants.vcf
# Find variants on a specific chromosome
awk '$1 == "chr1"' variants.vcf | grep -v "^#"
# Extract passing variants only
awk '$7 == "PASS" || /^#/' variants.vcfThe bcftools program provides powerful tools for VCF manipulation, including filtering, merging, and statistical analysis. Combined with tabix for indexing, these tools enable efficient processing of large variant datasets.
GFF/GTF Format
GFF (General Feature Format) and GTF (Gene Transfer Format) describe genomic features like genes, exons, and regulatory elements. Both are tab-separated with nine columns: chromosome, source, feature type, start, end, score, strand, frame, and attributes.
# Count genes
awk '$3 == "gene"' annotations.gff | wc -l

# Extract all exons for a specific gene
grep "gene_name \"TP53\"" annotations.gtf | awk '$3 == "exon"'

# List all feature types
cut -f3 annotations.gff | sort | uniq -c
Working with Compressed Files
Bioinformatics files are frequently compressed to save space. Common compression formats include:
- gzip (
.gz): Standard compression, usezcat,zgrep,zless - bgzip (
.gz): Block-gzip for indexed access, compatible with gzip tools - bzip2 (
.bz2): Higher compression ratio, usebzcat,bzgrep
# Read compressed files without decompressing
zcat sequences.fasta.gz | head
zgrep "^>" sequences.fasta.gz | wc -l
zless large_file.txt.gz

# Decompress files
gunzip file.gz          # removes .gz, creates uncompressed file
gunzip -k file.gz       # keep original compressed file
gunzip -c file.gz > output.txt  # decompress to stdout

# Compress files
gzip file.txt           # creates file.txt.gz
gzip -k file.txt        # keep original uncompressed file
4.15 Connecting to Remote Systems
The ssh command (secure shell) lets you connect to remote computers.
ssh username@server.university.eduYou will use this to connect to computing clusters like Talapas for computationally intensive work. Once connected, you work in a shell environment on the remote system just as you would locally.
The scp command copies files between your computer and remote systems.
scp local_file.txt username@server.edu:~/destination/
scp username@server.edu:~/remote_file.txt ./local_copy.txt
4.16 Practice Exercises
The best way to learn command-line skills is through practice. Save a digital record of your work so that you can study it later if you need to.
Open up a terminal and execute the following using Unix commands:
- Print your working directory using
pwd - Navigate to a directory somewhere below your home directory where you want to practice writing files
- Make 5 directories called
dir_1,dir_2,dir_3,dir_4, anddir_5usingmkdir - Within each of those directories, create files called
file_1.txt,file_2.txt, andfile_3.txtusingtouch - Open
file_1.txtindir_1using a plain text editor (such asnanoorvim), type a few words, and save it - Print
file_1.txtindir_1to the terminal usingcat - Delete all files in
dir_3usingrm - List all of the contents of your current directory line-by-line using
ls -l - Delete
dir_3usingrmdir
For this exercise, create a sample tab-separated file or download a GFF file from a genomics database.
- Navigate to
dir_1 - Copy a data file (using its absolute path) to your current directory
- Delete the copy that is in your current directory, then copy it again using a relative path this time
- Use at least 3 different Unix commands to examine all or parts of your data file (try
cat,head,tail,less, andwc) - What is the file size? Use
ls -lhto find out - How many lines does the file have? Use
wc -l - How many lines begin with a specific pattern (like a chromosome name)? Use
grep -c "^pattern" - How many unique entries are there in a specific column? Use
cutandsort -u | wc -l - Sort the file based on reverse numeric order in a specific field using
sort -k -nr - Capture specific fields and write to a new file using
cutand redirection - Replace all instances of one string with another using
sed 's/old/new/g'
Practice combining commands with pipes to answer questions about your data:
Count the number of unique values in the third column of a tab-separated file:
cut -f3 data.tsv | sort | uniq | wc -lFind all lines containing a pattern, extract specific columns, and sort the results:
grep "pattern" data.tsv | cut -f1,2,5 | sort -k3,3 -nCreate a pipeline that filters rows based on a condition, extracts columns, and saves to a new file
Use
awkto filter rows where a numeric column exceeds a threshold:awk '$5 > 1000 {print $1, $2, $5}' data.tsv
- Create a simple shell script that prints “Hello, World!” and the current date
- Try to run the script—what error do you get?
- Make the script executable using
chmod +x - Run the script and verify it works
- Examine the permissions of various files in your system using
ls -l - Practice changing permissions using both symbolic notation (
chmod u+x) and octal notation (chmod 755)
4.17 Additional Resources
- Unix/Linux Command Reference - A comprehensive cheat sheet of common commands
- Unix and Perl Primer for Biologists - An outstanding tutorial by Keith Bradnam and Ian Korf, specifically designed for life scientists
- Introduction to Shell for Data Science - DataCamp’s interactive tutorial
- The GNU Awk User’s Guide - Comprehensive documentation for mastering
awk - Software Carpentry Shell Lessons - Excellent tutorials designed for researchers