#!/usr/bin/env Rscript
library(tidyverse)
args <- commandArgs(trailingOnly = TRUE) # c("results/fasta_stats.tsv", "results/fasta_stats.png")
stats <- read_tsv(args[1])
p <- ggplot(stats, aes(x = file, y = gc_percent)) +
geom_col() +
labs(x = NULL, y = "GC content (%)") +
theme_minimal()
ggsave(args[2], p, width = 8, height = 4)
cat("Wrote", args[2], "\n")Lecture 10
Talapas and High Performance Computing
Bill Cresko
2026-11-30
Book reading for this lecture
The course book goes deeper on everything in this lecture. Read before or after class:
Goals for today
- Basics of working with Talapas
- The SLURM job scheduler
- Software on the cluster: modules, with the conda environments you built in L09 on top
- Monitoring your jobs
- Running R (
Rscript) and Python (python3) scripts as batch jobs
Talapas and High Performance Computing
What is Talapas?
- Talapas is UO’s high-performance computing (HPC) cluster
- Named from Chinook word for coyote (educator and keeper of knowledge)
- Managed by Research Advanced Computing Services (RACS)
- Located in the Allen Hall Data Center
- https://uoracs.github.io/talapas2-knowledge-base/
Key Resources:
- Over 14,520 CPU cores
- 129 TB of memory
- 89 GPUs (including A100, H100, V100)
- 3+ Petabytes of storage
Talapas Architecture

Login Nodes vs Compute Nodes
Login Nodes (Head Nodes)
- Where you land when you SSH into Talapas
- For light tasks only: file management, editing, job submission
- Shared by all users - be considerate!
- Heavy processes will be killed
Compute Nodes
- Where your actual work runs
- Accessed through the SLURM scheduler
- Different types for different needs:
- Standard CPU nodes
- GPU nodes
- High-memory (“fat”) nodes
Node Types on Talapas
| Node type (general use) | How many | Cores per node | Memory per node | Purpose |
|---|---|---|---|---|
| Standard CPU (AMD Milan) | 43 | 128 | 512 GB | General computation |
| GPU | 24 | 48 | 256 - 512 GB | Machine learning, CUDA (52 NVIDIA A100 GPUs in total) |
| Large memory | a few | varies | up to 4 TB | Memory-hungry jobs (e.g. genome assembly) |
| Interactive | 19 | varies | varies | Testing, development, Open OnDemand sessions |
Note
Researchers can also buy condo nodes that their group gets priority on - about 166 more CPU nodes plus V100, A100, and H100 GPUs. Numbers from RACS; check the Knowledge Base for the current list.
Partitions (Queues)
| Partition | Time limit | Use it for |
|---|---|---|
compute |
1 day | General CPU jobs (the default choice) |
computelong |
14 days | Long CPU jobs |
gpu |
1 day | Jobs that need a GPU |
gpulong |
14 days | Long GPU jobs |
interactive |
12 hours | Shorter interactive CPU sessions |
interactivegpu |
8 hours | Shorter interactive GPU sessions |
memory |
1 day | Jobs needing lots of memory (up to 4 TB) |
memorylong |
14 days | Long, memory-hungry jobs |
Tip
Run sinfo on Talapas to see every partition, including your lab’s condo partitions.
Getting Access to Talapas
Step 1: Join or Create a PIRG
- PIRG = Principal Investigator Research Group
- Contact your PI to be added to their PIRG
- Or contact RACS to create a new PIRG
Step 2: Request Access
- Visit racs.uoregon.edu/request-access
- Your username = your Duck ID
- Your password = your UO password
Logging Into Talapas - web browser
- No command line needed!
- File browser for uploads/downloads
- Interactive applications:
- JupyterLab/Notebooks
- RStudio Server
- MATLAB
- Remote desktop
Great for:
- Beginners learning HPC
- Quick file management
- Interactive data analysis
- Running GUI applications
SSH keys - log in without a password
- An SSH key is a matched pair of files - a public key (the lock, safe to share) and a private key (the key, never share it)
- You give the public key to a server once; after that it recognizes your computer - no password typing
- You’ll use SSH keys to connect to Talapas (today) and GitHub (Lecture 10)
- Create one now with a single command:
ssh-keygen -t ed25519(accept the defaults; a passphrase is optional but wise)
Note
Your public key is ~/.ssh/id_ed25519.pub; ssh-copy-id you@login.talapas.uoregon.edu puts it on Talapas so that later logins skip the password (Duo still applies).
Logging Into Talapas - command line
From a terminal (macOS, Ubuntu/WSL, VS Code, Positron):
# Through the load balancer - works from anywhere (expect a Duo prompt)

ssh yourduckid@login.talapas.uoregon.edu

# With the UO VPN connected you can also pick a specific login node

ssh yourduckid@login1.talapas.uoregon.edu
ssh yourduckid@login2.talapas.uoregon.edu
ssh yourduckid@login3.talapas.uoregon.edu
ssh yourduckid@login4.talapas.uoregon.edu
From Windows:
- Use the Ubuntu (WSL) terminal
- Or VS Code / Positron with the Remote-SSH extension
Note
The Knowledge Base says the UO VPN is recommended, not required. Off campus without the VPN: SSH to the load balancer login.talapas.uoregon.edu and answer the Duo two-step prompts.
Connecting VS Code to Talapas (Remote-SSH)
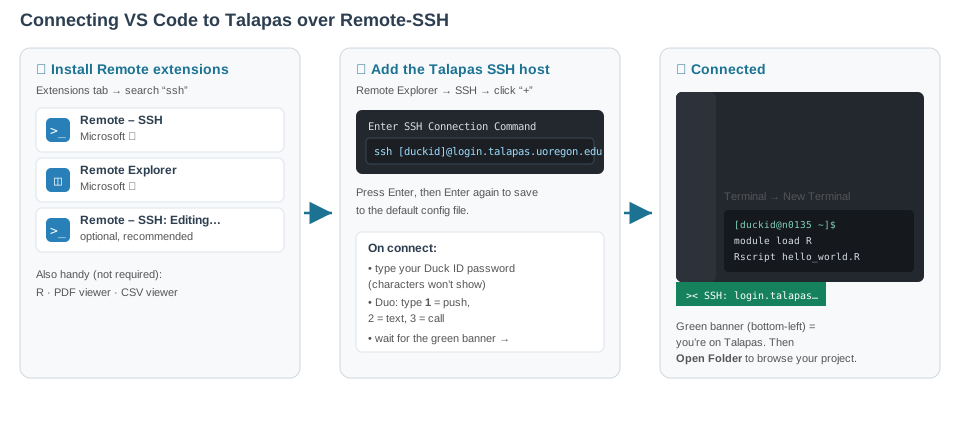
Tip
With Remote - SSH, VS Code (or Positron) runs its editor on your laptop while the files, terminal, and code live on Talapas - it feels just like working locally.
Storage on Talapas

Directory Structure:
| Location | Quota | Purpose |
|---|---|---|
/home/duckid |
250 GB | Config files, small scripts |
/projects/PIRG/duckid |
Shared (2 TB default) | Large data, analysis |
/projects/PIRG/shared |
Shared | Files shared with group |
/tmp |
Local to node | Temporary scratch space |
Important Notes:
- Data is NOT automatically backed up!
- Use
/projectsfor large files - Clean up when done
What is SLURM?
- Simple Linux Utility for Resource Management
- Job scheduler and workload manager
- Allocates resources fairly among users
- Ensures efficient cluster utilization

Key Concepts:
- Jobs: Units of work you submit
- Partitions: Queues with different properties
- Accounts: Your PIRG for resource tracking
Essential SLURM Commands
# Submit a batch job

sbatch myscript.sh

# Check your jobs in the queue

squeue -u $USER

# Check all jobs on a partition

squeue -p compute

# Cancel a job

scancel JOBID

# Get detailed job info

scontrol show job JOBID

# Check job history and resource usage

sacct -j JOBID --format=JobID,Elapsed,MaxRSS

# View partition information

sinfo -p compute
Interactive Jobs
For testing and development:
When to use interactive jobs:
- Testing your workflow before batch submission
- Debugging code
- Quick data exploration
- Running GUI applications
Note: Your prompt will change from login1 to something like n049
Writing a SLURM Batch Script
A batch script is a shell script with #SBATCH directives on top. The last lines are the same commands you would type on your laptop - Rscript or python3.
#!/bin/bash
#SBATCH --job-name=my_analysis      # Job name
#SBATCH --partition=compute         # Partition (queue)
#SBATCH --account=myPIRG            # Your PIRG name
#SBATCH --output=output_%j.log      # Standard output (%j = job ID)
#SBATCH --error=error_%j.log        # Standard error
#SBATCH --time=04:00:00             # Time limit (HH:MM:SS)
#SBATCH --nodes=1                   # Number of nodes
#SBATCH --ntasks-per-node=1         # Tasks per node
#SBATCH --cpus-per-task=4           # CPUs per task
#SBATCH --mem=16G                   # Memory per node

# Load required modules

module load R/4.3.3

# Run your program

Rscript my_analysis.R
#!/bin/bash
#SBATCH --job-name=my_analysis_py # Job name
#SBATCH --partition=compute # Partition (queue)
#SBATCH --account=myPIRG # Your PIRG name
#SBATCH --output=output_%j.log # Standard output (%j = job ID)
#SBATCH --error=error_%j.log # Standard error
#SBATCH --time=04:00:00 # Time limit (HH:MM:SS)
#SBATCH --nodes=1 # Number of nodes
#SBATCH --ntasks-per-node=1 # Tasks per node
#SBATCH --cpus-per-task=4 # CPUs per task
#SBATCH --mem=16G # Memory per node
# Load required modules
module load python3/3.11.4 # or: module load miniconda3/20240410
# conda activate my_env (your L09 environment)
# Run your program
python3 my_analysis.py#!/bin/bash
#SBATCH --job-name=fasta_pipeline
#SBATCH --partition=compute
#SBATCH --account=myPIRG
#SBATCH --output=output_%j.log
#SBATCH --error=error_%j.log
#SBATCH --time=01:00:00
#SBATCH --cpus-per-task=2
#SBATCH --mem=8G
set -e # stop the job if any step fails
module load python3/3.11.4
module load R/4.3.3
# Step 1 (Python): summarise every FASTA file into one table
python3 fasta_stats.py data/*.fasta > results/fasta_stats.tsv
# Step 2 (R): read that table, make the figure
Rscript plot_stats.R results/fasta_stats.tsv results/fasta_stats.pngRunning example: the stickleback summary as a batch job
Put the Week 6 code in a script, stickle_means.R, that writes results/gene_means.tsv, then wrap it in a Slurm script:
#!/bin/bash
#SBATCH --job-name=stickle_means
#SBATCH --account=<your_pirg>
#SBATCH --partition=compute
#SBATCH --time=00:10:00
#SBATCH --mem=4G
#SBATCH --cpus-per-task=1
#SBATCH --output=logs/stickle_%j.out
#SBATCH --error=logs/stickle_%j.err

module load R/4.4.0
cd ~/projects/comptools
Rscript stickle_means.R data/Stickle_RNAseq.tsv results/gene_means.tsvTip
Nothing about the R script changed between your laptop and Talapas - only where it runs and who launches it (sbatch instead of you). For the term project, this same pattern scales to files thousands of times larger.
What the job actually runs
The scripts are ordinary R and Python programs - the same ones you test on your laptop first. Arguments come from the command line so nothing is hard-coded.
#!/usr/bin/env python3
import sys
from pathlib import Path

print("file\tn_seqs\ttotal_bp\tgc_percent")           # header of the TSV
for path in map(Path, sys.argv[1:]):                 # every file given on the command line
    lines = path.read_text().splitlines()
    n_seqs = sum(line.startswith(">") for line in lines)
    seq = "".join(line for line in lines if not line.startswith(">")).upper()
    gc = 100 * (seq.count("G") + seq.count("C")) / len(seq)
    print(f"{path.name}\t{n_seqs}\t{len(seq)}\t{gc:.1f}")
Tip
Test on a tiny input on the login node first (python3 fasta_stats.py small.fasta), then submit: sbatch run_pipeline.sh. Output and errors land in output_JOBID.log and error_JOBID.log.
Three ways to get software onto Talapas
| Layer | What it is | Best for |
|---|---|---|
| Lmod modules | centrally installed software: module load |
compilers, CUDA, R and Python themselves, common tools |
| Per-user environments | a conda env / venv, or an R library pinned with renv |
your project’s packages, at exact versions |
| Containers (Apptainer) | one image file holding an entire OS + software stack | reproducing published pipelines; moving between clusters |
- Most real projects use the first two together:
module loadthe interpreter, then activate your own environment on top - last Monday (L09) was devoted to exactly that - Modules are read-only and their versions change over time - that is why you keep your own environment on top
- Containers are the strongest reproducibility guarantee; we won’t need them in this course - see Ch. 20
- Today we lean on the modules; layer your own environment on top exactly as you practiced last week
Understanding SLURM Directives
| Directive | Description | Example |
|---|---|---|
--partition |
Queue to use | compute, computelong, gpu, memory |
--account |
PIRG for accounting | myPIRG |
--time |
Max runtime | 1-12:00:00 (1 day, 12 hrs) |
--nodes |
Number of nodes | 1 |
--cpus-per-task |
Cores per task | 8 |
--mem |
Memory per node | 32G |
--mem-per-cpu |
Memory per CPU | 4G |
--gres |
Generic resources | gpu:1 |
Tip: Request only what you need - smaller jobs run sooner!
GPU Jobs
#!/bin/bash
#SBATCH --job-name=gpu_job
#SBATCH --partition=gpu             # GPU partition
#SBATCH --account=myPIRG
#SBATCH --time=1-00:00:00           # 1 day
#SBATCH --nodes=1
#SBATCH --ntasks-per-node=1
#SBATCH --gres=gpu:1                # Request 1 GPU
#SBATCH --mem=32G

# Load CUDA and your software

module load cuda/12.4
module load miniconda3/20240410

# Activate your conda environment (built in L09)

conda activate my_ml_env

# Run your GPU code

python train_model.py
Check available GPUs:
Talapas Uses Software Modules (LMOD)
# List all available modules
module avail

# Search for specific software
module spider R
module spider python          # python3/3.x.y modules, plus miniconda3 for conda environments

# Load a module
module load R/4.3.3
module load miniconda3/20240410

# See what's loaded
module list

# Unload a module
module unload R

# Reset to default
module purge
Note
In your batch scripts, always load modules after the SBATCH directives!
Monitoring Your Jobs
Common Status Codes:
| Code | Meaning |
|---|---|
| PD | Pending (waiting) |
| R | Running |
| CG | Completing |
| CD | Completed |
| F | Failed |
Using all those cores: parallel R
One node, many cores - but R uses one
- A Talapas node has dozens of cores, but a plain R (or Python) script runs on one of them
- Many analyses are embarrassingly parallel - the same independent computation repeated many times: bootstraps, per-gene models, simulations, one-file-per-sample processing
- The
future/furrrpackages make parallel R nearly drop-in - that is this week’s second reading, Ch. 21
A taste: parallel R in three lines
- Match workers to your SLURM request:
#SBATCH --cpus-per-task=8→workers = 8 - Only worth it when each task takes real time - starting workers has overhead
- Everything else you saw today - batch scripts, modules, storage - stays exactly the same
Best Practices for Talapas
Do:
- Request only resources you need
- Test with small datasets first
- Use
--timeconservatively - Clean up old files regularly
- Use
/projectsfor large data
Don’t:
- Run heavy computation on login nodes
- Leave jobs running indefinitely
- Store sensitive data without encryption
- Forget to acknowledge RACS in publications
Getting Help with Talapas
Resources:
- Documentation: uoracs.github.io/talapas2-knowledge-base
- Service Desk: hpcrcf.atlassian.net/servicedesk
- Email: racs@uoregon.edu
- Office Hours: Knight Library, Dream Lab 122E (Wednesdays 1-3pm)
Acknowledgment Text:
“The authors acknowledge Research Advanced Computing Services (RACS) at the University of Oregon for providing computing resources that have contributed to the research results reported within this publication.” ## Summary - and the whole course in one slide
- Talapas is the same shell, the same scripts, the same environments - just a much bigger computer with a queue in front of it
- The full arc of this course: shell pipelines → R/Python scripts → data frames and figures → Quarto documents → a published GitHub repository → environments that travel → Talapas at scale
- Every tool here is free, open, and the daily standard in computational science - you now speak the language
- HW2 is due today; final projects are due Friday, December 11 - Ex 10 is the cluster leg of the project, do it this week
BioE Computational Tools 2026 - Knight Campus