Lecture 08
Git, GitHub and GitHub Pages
2026-11-16
Book reading for this lecture
The course book goes deeper on everything in this lecture. Read before or after class:
Goals for today
- Git and GitHub
- hands-on git:
init,add,commit,pushandpull - seeing the history:
git status,git log,git diff - branches and pull requests to explore after class
- hands-on git:
- Publishing websites with GitHub Pages
- Reminder: HW1 is due tonight on Canvas; HW2 goes out today (due Nov 30)
On your own this week
Work through this one-hour video alongside the book chapter
It covers today’s whole arc a second time, at a gentler pace
Do you have Git?
Open a terminal and run
git --version.A version number means you’re ready.
An error = install Git now, and keep up with the slides while it runs
- Download the installer for any operating system at git-scm.com/downloads, and accept the defaults
- macOS shortcut:
xcode-select --installin the terminal does it too - Inside WSL/Ubuntu:
sudo apt-get install git
- macOS shortcut:
Configure Git
Git stamps every commit with an author, so tell it who you are
You only need to do this once per computer, and you can update later on
# Set your name and email
# use the SAME email as your GitHub account

git config --global user.name "Your Name"
git config --global user.email "your.email@example.com"

# Make every new repository start on a branch named 'main'
# (older Git versions default to 'master' - set this once and forget it)

git config --global init.defaultBranch main

# Check your settings

git config --list
Creating a GitHub Account
Go to github.com and click “Sign up”
Choose a username
professional and memorable; it becomes part of your public URL (
username.github.io)so think
future_CV, notrat_farts_2000
Add your university email (you can add others later)
Verify your account from the email they send
Then apply for the GitHub Student Developer Pack:
- Free GitHub Pro while you’re a student
- Access to development tools
- Apply at education.github.com
Using Git and GitHub
Git and GitHub
What is Git?
- Git is a distributed version control system
- Tracks changes in your code over time
- Allows collaboration with others
- Maintains complete history of all changes
What is GitHub?
- GitHub is a web-based hosting service for Git repositories
- Provides cloud storage for your code
- Enables collaboration features
- Hosts documentation and websites (GitHub Pages)
- Free for public repositories
GitHub for Scientific Collaboration
- Reproducibility: the complete history of how every figure was made - “code available at github.com/yourlab/…” is what journals and funders increasingly require
- Collaboration: labmates and collaborators work on the same analysis - no more emailing
script_final_v3_REALLY.Raround - Lab continuity: when a student graduates, the analysis stays - with the history of why each choice was made
- Documentation: README files, wikis, and GitHub Pages
- Issues: track bugs, ideas, and to-dos right next to the code
- Releases + DOIs: tag the exact version used in a manuscript and linking Zenodo turns a release into a citable DOI
- Reuse: most published pipelines live on GitHub - clone them, read them, and build on them
Git Workflow Concept

Git workflow: working directory, staging area, local and remote repositories
Git Branching and Collaboration
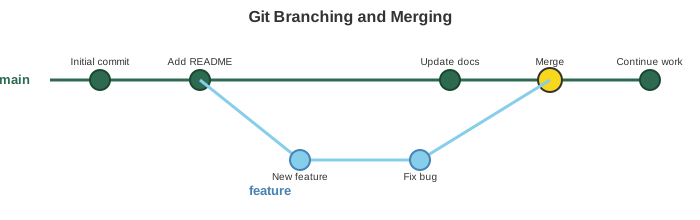
Authenticating to GitHub
Pushing needs more than your password - GitHub stopped accepting passwords from the command line in 2021, and the first
git pushis where everyone gets stuck.We’ll all use the GitHub CLI (
gh), the easiest route:
# 1. Install the CLI

brew install gh                  # macOS
winget install --id GitHub.cli   # Windows
sudo apt-get install gh          # Ubuntu / WSL
# (no package manager? installers for every OS at cli.github.com)

# 2. Log in - one time only

gh auth login

# gh now asks four questions in the terminal; pick these answers:
#   "Where do you use GitHub?"            answer: GitHub.com
#   "Preferred protocol?"                 answer: HTTPS
#   "Authenticate Git with credentials?"  answer: Yes
#   "How would you like to authenticate?" answer: Login with a web browser
#
# It then prints a one-time code: copy it, press Enter, and paste the
# code into the browser window that opens. That's the whole login.

# 3. Confirm it worked

gh auth status                   # "Logged in to github.com as USERNAME"
Tip
Done once, done forever on this machine.
The alternatives - SSH keys (which also log you in to Talapas in Week 10) and credential managers - are in Ch. 19.
Creating repositories
A new repository, from your laptop to GitHub
# 1. Make a project and put it under version control

mkdir ~/projects/git_practice && cd ~/projects/git_practice
git init                      # creates the hidden .git/ folder
git status                    # read what it says

# 2. Create a few files worth tracking

echo "# My first repository" > README.md
echo 'print("hello, git")' > analysis.py
echo "lab notes, day 1" > notes.txt
Stage and commit it
# 3. Stage - three ways to say what goes into the commit

git add README.md             # one file, by name
git add *.py                  # wildcard: every .py file
git add .                     # everything new or changed from here down

# 4. Commit the staged snapshot

git commit -m "First commit: README, analysis script, notes"
git status                    # "working tree clean" - everything is recorded
Best Practices for Commits
Messages - the history is for readers (including future-you)
- First line short (~50 characters) and imperative: “Add violin plot”, not “Added some stuff”
- Say why, not just what - the diff already shows the what
- Bad:
stuff,final,final2,fixed it· Good:Normalize counts before PCA
Habits
- Commit early and often - one logical change per commit, so the history reads like a lab notebook and any single step can be undone
git statusandgit diffbefore every commit - know exactly what you are recording- Pull before you start, push when you stop - the habit that keeps two machines (or two people) out of trouble
Viewing Commit History
What changed? git diff and commit hashes
- A hash is the commit’s name - quote it in lab notebooks (“results from
7d4e8c2”) and use it anywhere a command wants a commit - HEAD is simply the commit you are standing on right now;
HEAD~1is one commit back
Walkthrough: connect it to GitHub
First, make the repository’s empty home on GitHub - we’ll click through this together:
- On github.com: + (top right) → New repository
- Name it
git_practice - Leave it completely EMPTY - no README, no license, no .gitignore (those would start a history that conflicts with yours)
- Click Create repository - the next page shows a “…or push an existing repository from the command line” box
- Copy YOUR repository’s URL from that box (it contains your username - don’t type mine from the screen)
Note
Why
branch -M main? Older Git creates the first branch asmaster(harmless if yours is alreadymain)GitHub takes the first branch you push as the repository’s default, so push
mainfirst and the two sides agree.
Syncing back to your computer: pull
Your repository now lives in two places - so finish the loop:
# 1. On github.com: open README.md, click the pencil icon,
#    add a line, and commit the change THERE

# 2. Bring that commit down to your laptop

git pull

# 3. Proof - both commits, one history, each with its short hash

git log --oneline             # e.g.  f8c21aa  Add line from the web
                              #       7d4e8c2  First commit: README, ...

# 4. And exactly what changed between any two commits, by their hashes:

git diff 7d4e8c2 f8c21aapushandpullare the same verb in opposite directions - this is also how you’ll move between laptop and Talapas in Week 10- Daily rhythm from here on:
git pull→ edit →git add .→git commit -m "..."→git push
Tip
Lost or confused?
git statusalways tells you the next command.And worst case: your work is on GitHub - delete the folder and
git cloneit back.
Why .gitignore? Not everything belongs in history
- Git never forgets so that every version of every tracked file stays in the repository forever - perfect for code, terrible for bulk files
- Much of a project folder doesn’t need tracking:
- raw data (it never changes - record where it lives instead)
- outputs you can regenerate
- editor and system droppings (
.DS_Store,.Rhistory), package caches
- GitHub enforces this economy
- a file over 100 MB is rejected outright (warnings start at 50 MB)
- a repository should stay under 1 GB - 5 GB at the outside
- The fix is a
.gitignorefile: a list of patterns Git pretends not to see - Write it first, before
git add . - Ignoring a file that is already committed does not remove it from the history
.gitignore File
Exclude files from version control:
Common patterns to exclude:
Best Practices: what belongs in a repository
project/
├── README.md          # Project description - the front page on GitHub
├── .gitignore         # What Git should never track
├── data/              # Raw data (usually .gitignore'd - README says where it lives)
├── analysis/          # Analysis scripts (.R, .py, .sh, .qmd)
├── results/           # Output files (commit small tables/figures; regenerable ones can be ignored)
└── docs/ # Documentation, or the rendered website for Pages- Yes: code, text, notebooks, config,
environment.yml(next week) - small, human-readable, hard to recreate - No: large raw data (put where it lives in the README), regenerable bulk output,
.quarto/ - NEVER: passwords, API keys, tokens - even in a private repository; treat every commit as permanent and public
GitHub Pages
GitHub Pages lets you host websites for free

From Quarto source to a live website
- Any repository can serve a website
- Settings → Pages → Deploy from a branch →
main,/docs - Live at
https://username.github.io/repo_name
- Settings → Pages → Deploy from a branch →
- Quarto fits perfectly
output-dir: docsin_quarto.ymlmeansquarto renderfillsdocs/- a push publishes it (
quarto publish gh-pagesis the one-command alternative)
Let’s take last week’s website live
In L07 you built
example_website- a real four-page Quarto site (home, research, publications, CV) with your details in itA website is just a folder of HTML files; GitHub Pages will serve that folder to the world.
Step one is getting the folder rendered and under version control:
cd ~/projects/my_website        # your website project from last week

# 1. Render the site one final time
#    _quarto.yml says output-dir: docs, so the finished HTML
#    lands in docs/ - open docs/index.html to see what will go live

quarto render
touch docs/.nojekyll            # tells GitHub Pages: serve the files as-is

# 2. Exactly the walkthrough from earlier - plus the .gitignore,
#    so Quarto's working folder stays out of the repository

git init
echo ".quarto/" > .gitignore
git add .
git commit -m "First commit: my academic website"
git branch -M main
Flip the switch to make it live
- On GitHub: Settings → Pages → Deploy from a branch →
main,/docs→ Save - you are telling GitHub “serve thedocs/folder ofmainas a website” - Watch the repository’s Actions tab: a “pages build and deployment” job runs for about a minute and turns green
- Open
https://USERNAME.github.io/my_website- on your phone too; it is the public internet now - Updating the site from here on is just the daily rhythm: edit a
.qmd→quarto render→git add .→git commit→git push- live about a minute later
Tip
That URL is real, permanent, and free - put it in your email signature.
It is also the mechanism that your term project report will use.
Start now: publish your personal website
- Finish personalizing it: your name, your research, your CV pages
quarto render→touch docs/.nojekyll→git init→ commit - exactly today’s finale, on your own machine- Push it to a new repository and flip on Pages - your site, at your URL, in your email signature by Friday
- From then on, every improvement is just render → commit → push
Tip
The same publish loop ends HW2 (goes out today, due Monday, November 30: analysis → Quarto report → pushed to GitHub)
The same loop ends the term project too (due Friday, December 11, with a README like the example).
Summary
- Git records every step through
git addandgit commit - GitHub backs it up, shares it, and (with Pages) publishes it
- The arc so far: shell pipelines → R/Python scripts → data frames and figures → Quarto documents → a published, reproducible project
- Still to come: environments that travel (L09) and Talapas at scale (L10) - the last two pieces of the loop
- Reminder - every tool here is free, open, and the daily standard in computational science
For later - on your own
Branching and Merging
git switch (and git restore, two slides on) are the modern commands that split the overloaded git checkout in two - older tutorials say checkout, and both forms work:
Common Git Workflow with Branches
Daily Development Cycle
# 1. Start your day - update your local copy

git pull origin main

# 2. Create a feature branch

git switch -c new-feature

# 3. Make changes and commit regularly

git add .
git commit -m "Add new analysis function"

# 4. Push your branch

git push origin new-feature

# 5. Create pull request on GitHub (via website)
Undoing: git restore and resetting HEAD
# Discard your edits to a file (back to the last commit) - GONE for good

git restore analysis.R

# Un-stage a file, keeping your edits

git restore --staged analysis.R

# Undo the last commit, three strengths:

git reset --soft HEAD~1    # undo commit, keep changes staged
git reset HEAD~1           # undo commit, keep changes unstaged
git reset --hard HEAD~1    # undo commit, DISCARD the changes
Warning
restore (without --staged) and reset --hard delete real work with no confirmation. Run git status and git diff first, so you know exactly what you are throwing away. App. H has the full undo table.
Cloning an Existing Repository
The other way a repository reaches your laptop - someone else’s (or yours, on a new machine):
Resources and Help
Keep going
- The one-hour video from the start of class: Learn Git & GitHub for Beginners (Coder Coder)
- Ex 8 - today’s whole class as short tasks, plus branching and the rescue drill
- GitHub Docs
(https://docs.github.com) - Pro Git Book
(https://git-scm.com/book) (free online) - GitHub Skills
(https://skills.github.com) - Quarto + GitHub Pages
(https://quarto.org/docs/publishing/github-pages.html)
BioE Computational Tools 2026 - Knight Campus